GUIDE: Encoding your video to H.264 using Sony Vegas and MeGUI.
First things first.
This guide focuses on encoding only! It will tell you everything you need to know about rendering to H.264 with Sony Vegas and MeGUI, but nothing on how to set up your Vegas project, adding effects etc. My knowledge is based on other guides and tutorials Ive been looking up over the past few weeks. Dont expect too much detail here ^^. Theres also been a video tutorial uploaded on warcraftmovies.com about it. However MeGUI has changed slightly and the video tutorial might not be as accurate as it used to be. Thats why I wrote this guide, and because Im sick of watching movies made with hours of editing, but then being rendered with some lousy .wmv format, having 500MB for 15 minutes at a resolution of 800*600 and still looking all blurry. 1. This is what youll need Some free disc space MeGUI AviSynth Lagarith Lossless Codec Time and of course Sony Vegas (Im using Vegas Pro 8.0, but any version should be fine) 2. Downloading / Installing Install all the programs listed above using the custom settings. (and for gods sake, dont ask me where to get Sony Vegas from ) MeGUI will most likely start automatically and ask for an update. Just abort everything and close it, youll deal with it later. 3. Encoding your video with the Lagarith Lossless Codec MeGUI will require an AVI video file in order to create a high quality mp4 file. For that, you want to use an uncompressed video format. Thats what you will need the Lagarith Lossless Codec for. Open your Sony Vegas project and select everything youd like to render. (Just the way you always do before rendering.) Now go to File and Render As In the drop down menu select Video for Windows and click on Custom In the Project tab select Best for the video rendering quality. In the Video tab be sure to match up everything with your project settings. This includes Frame size, Frame rate, Field order and Pixel aspect ratio. In the Video format dropdown select Lagarith lossless codec and click on Configure Check Enable Null Frames and Use Multithreading (You should leave the multithreading unchecked if youre using a single core processor.) Always Suggest RGB for Output should stay unchecked. In the dropdown menu under Mode select YV12 and hit OK. Interleave every (seconds) should be checked and at 0,250. Interleave every frame should be unchecked and Create an OpenDML (AVI version 2.0) compatible file should be checked. In the Audio tab Include audio should be checked. With "Audio format" at "PCM Uncompressed", "Sample rate" at 48.000, "Bit depth" at 16 and "Channels" at "Stereo". Hit OK! You can now save your video file, BUT this is where youll need the extra disc space. Since its a lossless compression of your movie the AVI file will be huge. For instance, a one minute long clip at 30 FPS with a resolution of 1680*1050 has around 1,5 Giga Bytes. Of course, the file size will vary depending on the FPS, resolution the amount of still images etc., but better be on the safe side and leave more than enough free disc space for the AVI file. (HINT: you can leave the video file name as Untitled, it may save you some time in the future, youll soon know what I mean) The rendering may take a while. When its done you can close Sony Vegas. 4. Setting up MeGUI Start MeGUI and update it. Simple push the Update button, you dont have to check or uncheck anything. MeGUI will update regularly, but dont worry; the updates probably wont affect the user interface. Once updated a Preset Importer will pop up. These presets define the quality and rendering speed of your movie. For this guide you only need to import the presets beginning with DVXA-HD and none of the audio presets, but Id recommend you to import all of them, just in case youd like to try some other rendering methods besides those I will suggest you. MeGUI will restart, and thats it! 5. Creating an AviSynth Script and adding the Video Now that youve set up MeGUI youll need an AviSynth Script. The script basically tells MeGUI what and how it has to encode. To make an AviSynth script open MeGUI (Unless youve never closed it. :P) On top of the main window press Tools and then AVS Script Creator. In the new window click on the three dots next to Video Input and select your newly encoded AVI file. A window should open showing you a random part of your movie. You can close the window, it only shows you if the file could be loaded properly or not. Now go to the Edit tab. The very first line should say something like: "AVISource("C:\Untitled.avi", audio=false). Change audio=false to audio=true. Otherwise MeGUI wont use the audio of your AVI file and youd have to add the audio separately. Click Save. Again a window opens showing you your movie, close it. An AviSynth Script-File was now added into folder of your AVI file and the script was automatically loaded into MeGUI. You can use this single AviSynth Script for all of your future encodings. As long as your uncompressed AVI files name stays the same and is in the same directory. Thereby you can simple click on the three dots next to AviSynth Script in the main window to add your script, and wont have to create a new one over and over again. ! Extra Info ! Many people like to encode their movies as a High Quality and a Normal Quality version. To do so, simple add a line to the AviSynth script. You can create or a new AviSynth script like I explained before, or just edit an existing by opening the AviSynth file with the Windows Notepad. I myself have two Scripts. One to encode at full resolution. Which looks like this: AVISource("C:\Untitled.avi", audio=true) And another one that has the addition line, like this: AVISource("C:\Untitled.avi", audio=true) BicubicResize(1008,630)[/code] All the second line does is to encode the movie at the resolution of 1008*630. 6. Video-Settings Still at the Input tab in the main window click at the Encoder settings dropdown. In there are all the presets youve added when setting up MeGUI. You can choose between several presets, but theres one I would recommend. Its the one called x264: DVXA-HD-Balanced. These presets define the quality and mainly the encoding speed of your final movie. However, since you should only use the DVXA-HD presets, the quality is somewhat the same. Thats why I suggest you to use the Balanced preset. The encoding time is bearable and the video quality is good too. (For instance: I tried the DVXA-HD-Insane preset to render a one minute long clip, and it took MeGUI two freakin hours to encode it! But there was hardly any visible difference to the DVXA-HD-Balanced version of the clip.) At the File format dropdown be sure to have MP4 selected. 7. Bitrate / File Size Everythings set, hit AutoEncode! Youre almost done. In the Container dropdown be sure to have MP4 selected. You may also change the file name. Last, but not least, File Size or Average Bitrate. Either you click on the little arrow next to File Size to define the size of your movie or you can try an Average Bitrate and look for yourself how big the video would become. It all comes down to File Size or Quality. Simply said, the more the better. Still, nobody wants to download 800MB for a 10 minute movie. My rule of thumb is something around 30MB per minute at a resolution of 1280*1024 with 30FPS. This would cause a 20 minutes long movie with a pretty high resolution to have around 600MB. For me, totally acceptable, but thats for you to decide. ;) 8. Encoding Once youve selected your desirable File Size or Bitrate hit Queue. An error might pop up when encoding at very high resolutions, but you can ignore it and simply click Yes. Now go to the Queue tab next to Input. In the bottom left corner hit Start to finally start the encoding. Thats it! When done encoding you can click on Clear to clear the log. It may seem a bit complicated at first, but since you can use the same AviSynth Script over and over again, this method will become pretty easy and fast to manage. With all the presets made in Sony Vegas and MeGUI it all comes down to four easy steps: Step 1: Encoding your movie to an AVI-File Step 2: Adding the AviSynth Script to MeGUI Step 3: Selecting the File Size or Bitrate Step 4: Encoding Enjoy! Feel free to correct me or give suggestions and I will edit this guide if necessary. After all I just summarized what I know from other guides, and even if this may not be the most effective way encoding to H.264 I've been pretty happy with the results. Oh.. and of course, excuse my half-good english ;) |
Thanks for this! My meGUI kept crashing when trying to encode with the HD-Balanced option but switching to Extra Quality appears to be fine.
Quick question, should I: a) do the above process for each individual FRAPS clip I have BEFORE importing into Vegas, then render it all again at the end... b) import the raw FRAPS clips into Vegas, do all my editing, do a lossless encode on the whole thing then encode it to H.264... c) do a lossless encode on each FRAPS clip, import to Vegas and do all my editing, then encode it to H.264. Thanks in advance. |
Option B.
I wouldn't choose a or c since they are way too time consuming. The only benefit is that you'd save some disc space. Also option a would probably cause a loss in quality. |
Good job! :D
|
Thank YOU SO MUCH! I don't even play mmorpg (don't hate on me) I'm a Halo guy, and am almost finished with a Halo 3 Fragvid I have been working on for months and months. It's and HD video... and now I can really take advantage of my quality!
One question... In vegas, u can render uncompressed .avi How is logarith compression better than this? |
hi, im using ulead videostudio 10 (similar to sony vegas) and megui tools to create a frag video, i can follow you guide all the way through, but megui nevers seems to have the audio present... ive made sure ive changed and saved the first statement of the script to "audio=true" instead of "audio=false" but it doesnt seem to make the audio evident.. the original .avi file has music/audio present, megui just seems to lose the audio.. any ideas why?
|
Well, I wouldn't exactly know why MeGUI won't encode it as well, I never happened to have problems with the audio stream. Maybe these problems occur because you're using slightly different audio and / or video settings. If so feel free to PM them to me and I will try to recreate the problem.
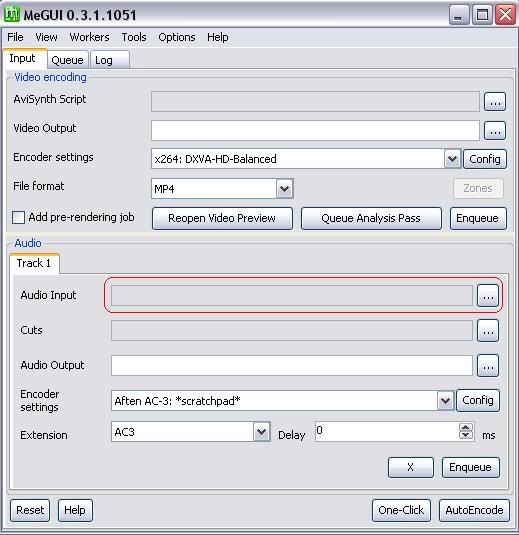
However, you can always add the audio stream separately with MeGUI. To do so, select your movie like you would render it to an AVI-file and render it as a Microsoft WAV-file. You may have to deselect your video stream, since you want to render an audio-file. Use the same or similar (basically high quality) settings for the WAV-file like in point 3 of my guide. When done go to MeGUI and at the "Input" tab just below "Video encoding" are the audio settings. At "Audio Input" add your newly created WAV-file. You can leave "Cuts" and "Audio Output" blank. At the "Encoder settings" select "LAME MP3:MP3-128ABR", "Extension" should be set to "MP3" and "Delay" should be at zero. That's it. You can hit Auto Encode and simple follow the guide again. |
I have a problem :(
When I try to render my video (in Vegas Platinum 9.0b) in Lagriss OR Uncompressed, I get an error when the file reaches 1.99GB:  Translation: There has been an error while creating ImmortalKT.avi. The rendered file has become larger then the valid maximum size for the selected format. Anyone got any tips? :( |
I really liked this and everything works, except i didnt get any sound. What could `be the problem?
|
Quote:
 Just throw the same file in there, and you should get your sound. If I'm mistaking, please correct me. Atleast I "think" I got the sound that way. As it goes for the tutorial, thanks a lot. I will actually render my next movie this way, since: 1) It's a bit less filesize than my previous method and 2) MeGUI has a sexy crop feature :D Keep it up! |
| Forum time (GMT) 07:01 PM |
Powered by vBulletin® Version 3.6.12
Copyright ©2000 - 2024, Jelsoft Enterprises Ltd.